Thursday, September 17, 2015

Krios Battle Tank

Here we have my trials and tribulations with the krios jerk tank, I mean battle tank. Behold its myriad of pieces. 


There wasn't much flash to cleanup or problems with removing the gateing. There was two large areas of imperfections in the molding. Nothing catastrophic but annoying, and some consumption of time required. The guns barrel you can see had some over flow, and the tracks were slightly off set down the length of them. The end of the barrel is not that bad as the gun has an additional piece which will cover it up, but I still felt some cleaning would improve it.


Now this wheel looked like it was going to be a problem cleaning. It wasn't the flash easily came off with just picking at it.


Here we see the tracks and the internal machinery. As well as how the external gear attaches.


The cannon is complete. I had to assemble the operator first then attach the large gears. You can see here the genius engineering I have concocted to help them stay in place while drying.  


The internal under body, wish the whole model had been this easy.


Here's where the kit started give me problems. At first I was all like "this so easy, they just slide here." Nope, off in the top you can see the shield which covers the front, and attacts to these rails. Well they may look right, but the right piece was too low. It required a lot of playing around, and cutting during assembly. 


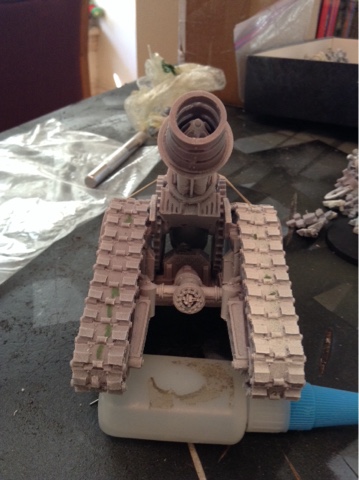
Final dry fit with all the pieces.


The gun is made to have a large arc of motion up if desired. I wanted it just shooting good old straight ahead. So I took some spree cut it and placed pieces in the center to keep this position.


Here we see the finished model, and a close up on the driver.


Here we see the basing going on the finished army. The belt feed on this second thanatar was much easier then the first. Defiantly must pin the the two parts together, then when heated will allow easy range of motion and attachment.


Here is the finished army. I will have to show in the future how I got the vorax belt feeds to go on. They started straight and had the end up bent 180'. Now their all ready to be shipped off to be painted.

Thursday, September 10, 2015

Thanatar siege automata build

Behold my journey building the Thanatar. the largest of the legio cybernetica's warmachines. As you can see below it has a few parts, it is no ghost ark, but the legs do have 10 pieces per leg. You will see the sexy rear shot of these assembled further down, and the belt feed, yeah we'll get there to. 


Here I have set up holes for pins to help me hold the belt as i warmed to resin and re-positioned the feed to line up with the wrist mounted gun on the left arm.


I used blue tac to get an idea how the legs would go. Then slowly glued one piece then the other corresponding leg piece, and so on. here you can see me setting up the guides for the pins in the hips. I also used paint to mark where there had been a bubble in the mold so I could easily see them once done and fill them.


Finished! with the legs. Well, with the large parts of the legs


I just wanted to show you the backside of the plasma mortar. let that name, and its effect in game sink in. Now you can see the spots for the tiny fuel canisters, all six said tiny canisters. fun little guys waiting to fall from your fingers and bounce, and scatter into oblivion. I thankfully did not lose any, but that is one of many reasons i have Instant Mold. Seriously people if you don't have it get some. Go to the Google, and it will lead you to the magic. 

But anyways here are the pieces to the mortar. The canisters i did pin. Even though small, and a slight pain, i used a very small bit. I could them too easily being brushed a little too hard, while not evening noticing it yourself and "poof" gone.  
The shoulder piece the mortar sits on was attached, and glued in place. I did have to heat the resin to get it nice and snug, but yet still removable. I haven't glued it yet as my friend Jake will be sending it off to a gentlemen in Poland I think, some Euro country. I wanted them to be able to handle it better if they chose to. The same reason the front plate you can see in the picture also hasn't been glued.


Here I am victorious over the belt feed. For the next one I will be doing just the minimum amount of work to connect them together, and then adjust the arm to fit the arm. Oh and also here we see the pieces for the leg ready to go.


And here is the back side. I glued each piston, both parts at the same time. The legs were not glued to the hip portion or base yet so I could more easily attach these parts.


Finally the metal monster is Alive! Or on its way at least. lastly some size comparison for the audience at home.


Thursday, September 3, 2015

Catching up with projects.

Haven't blogged in a couple weeks, here's what I've been up to.

I finally finished the harlequins. Here we have the last two and the Solitare. Just flock and paint the rim of the base and done done.


Group shot


Here we have my executioners that had been based on 25s, and I didn't feel like completely rebasing. These are the converter rings from secret weapon miniatures. You see the two on the wood litko bases on the bottom right. I tried just cutting away the rim and plopping them on there as they have very little debris like the rest. There a test. The rings didn't get snug like I wanted so there will be a lot of little gap filling with them. I'll have to turn this into a future post when I start work on them.


The pieces to a krios battle tank, and an unhelpful minion.


One of the now fully assembled castellax automata.


Lastly I have been working on an illustrated logo for my friend MP Johnson's first publishing venture. Finished with a whole day to spare. This is right before digital clean up. First fully drawing I've done in months, really have to correct that.